Qt Installer Framework 手册
概述
Qt Installer Framework提供了一组工具和实用程序,用于一次性创建安装程序,并在所有支持的桌面 Qt 平台上部署它们,而无需重写源代码。 安装程序将在运行它们的平台上具有原生外观,比如在Linux、Microsoft Windows 和 macOS上。
Qt Installer Framework工具生成带有一组页面的安装程序,这些页面在安装、更新或卸载过程中指导用户。 您提供可安装的内容并指定有关它的信息,例如产品和安装程序的名称以及许可协议的文本。
您可以通过向预定义页面添加widgets或通过添加整个页面为用户提供其他选项来自定义安装程序。 您可以创建脚本以向安装程序添加操作。
选择安装程序类型
您可以根据您的用例为最终用户提供离线或在线安装程序,或两者兼而有之。
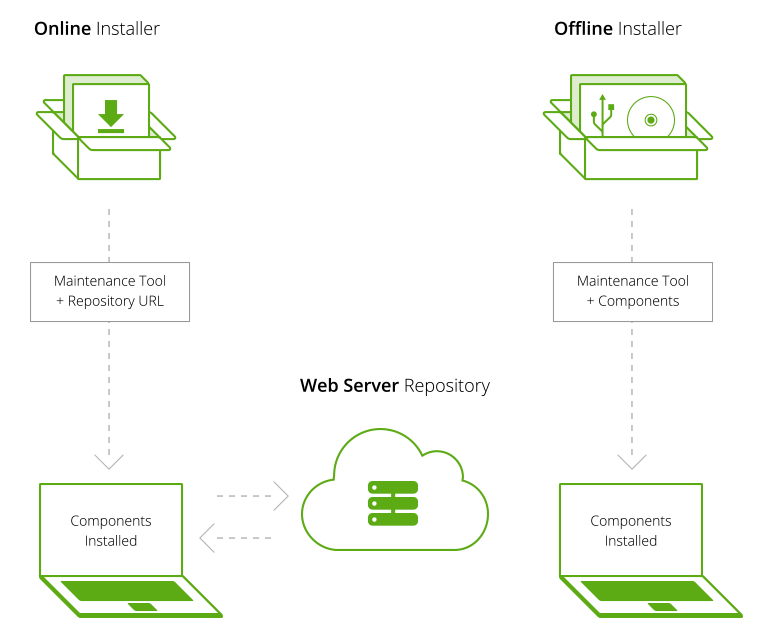
两种安装程序都安装了一个维护工具,以后可用于添加、更新和删除组件。 脱机安装程序包含所有可安装组件,并且在安装过程中不需要网络连接。 在线安装程序只安装维护工具,然后从 Web 服务器上的在线存储库下载和安装组件。 因此,与离线安装程序二进制文件相比,在线安装程序二进制文件的大小更小,下载时间也更短。 如果最终用户没有安装所有可用的组件,下载和运行在线安装程序的总时间也可能比下载和运行离线安装程序的时间短。
最终用户可以使用维护工具在初始安装后从服务器安装其他组件,以及在服务器上发布更新后立即接收内容的自动更新。 但是如果想在离线安装的情况下使用,则需要在离线安装程序配置中指定存储库地址或最终用户在维护工具设置中自己指定存储库地址。
创建离线安装程序,使用户可以直接将安装包下载到介质上,以便稍后安装到计算机上。 例如,您还可以在 CD-ROM 或 U 盘上分发安装包。
创建在线安装程序,使用户能够始终安装最新版本的内容二进制文件。
推送更新
提供在线存储库以向安装您的产品的最终用户推送更新。 提供更新的最简单方法是重新创建存储库并将其上传到 Web 服务器。 对于大型存��储库,您仅需要更新更改的组件。
为安装程序者提供内容
您可以让其他内容提供商将组件作为附加组件添加到安装程序。 组件提供者必须设置包含可安装组件的存储库,并将指向存储库的 URL 传递给最终用户。 然后,最终用户必须在安装程序中配置 URL。 附加组件在包管理器中可见。
教程:创建一个安装程序
本教程描述如何为一个小项目创建一个简单的安装程序:
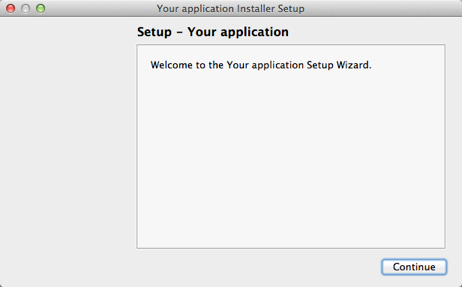
该章节描述了您创建安装程序所必须完成的任务:
- 创建一个安装包目录,其包含所有配置文件和可供安装的程序包。
- 创建一个配置文件,其中包含关于如何构建安装程序二进制文件和在线存储库的信息。
- 创建一个
package information文件,其包含关于可安装组件的信息。 - 创建安装程序内容并将其复制到
package目录。 - 使用
binarycreator工具创建安装程序。
安装程序的页面是使用您在configuration和package information文件中所提供的信息创建的。 示例文件位于Qt Installer Framework安装目录下的example/tutorial目录中。
创建一个Package目录
创建一个能体现安装程序设计的目录结构,并允许在将来扩展安装程序。 该目录必须包含名为config和packages的子目录。
有关Package目录的更多信息,请参见Package目录一节。
创建一个配置文件
在config目录中,创建一个名为config.xml的文件,包含以下内容:
<?xml version="1.0" encoding="UTF-8"?>
<Installer>
    <Name>Your application</Name>
    <Version>1.0.0</Version>
    <Title>Your application Installer</Title>
    <Publisher>Your vendor</Publisher>
    <StartMenuDir>Super App</StartMenuDir>
    <TargetDir>@HomeDir@/InstallationDirectory</TargetDir>
</Installer>
该配置文件指定了在简介页面上显示的以下信息:
-
<Title>指定了在标题栏上显示的安装程序名称(1)。 -
<Name>指定添加到页面名称和介绍文本(2)中的应用程序名称。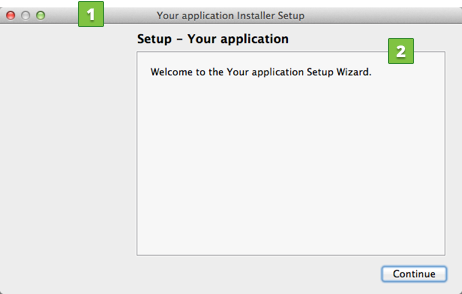
其他元素用于自定义安装程序的行为:
<Version>指定应用程序的版本号。<Publisher>指定软件的发布者(如在Windows控制面板中所展示的发布者)。<StartMenuDir>在Windows开始菜单中指定产品的默认程序组的名称。<TargetDir>为用户显示的默认目标目录是当前用户主目录中的 InstallationDirectory(因为预定义的变量@homedir@被用作值的一部分)。 要了解更多信息,请参阅 预定义变量一节。
有关配置文件格式和可用元素的更多信息,请参阅配置文件一节。
创建一个Package Information文件
在这个简单的场景中,安装程序只处理一个名为com.vendor.product的组件。为了向安装程序提供有关组件的信息,创建一个包含如下内容且名为package.xml的文件,并将其放入meta目录:
<?xml version="1.0" encoding="UTF-8"?>
<Package>
    <DisplayName>The root component</DisplayName>
    <Description>Install this example.</Description>
    <Version>0.1.0-1</Version>
    <ReleaseDate>2010-09-21</ReleaseDate>
    <Licenses>
        <License name="Beer Public License Agreement" file="license.txt" />
    </Licenses>
    <Default>script</Default>
    <Script>installscript.qs</Script>
    <UserInterfaces>
        <UserInterface>page.ui</UserInterface>
    </UserInterfaces>
</Package>
下面将对示例文件中的元素进行更详细的描述。 有关包信息文件的更多信息,请参见Package Information File Syntax。
指定组件的信息
以下元素的信息显示在组件选择页面上:
-
<DisplayName>在组件列表中指定组件的名称(1)。 -
<Description>指定当组件被选中时显示的文本(2)。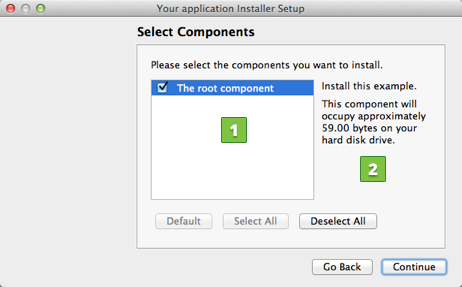
指定安装版本
<Version>当更新包可用时,可以向用户提供更新。
添加许可证
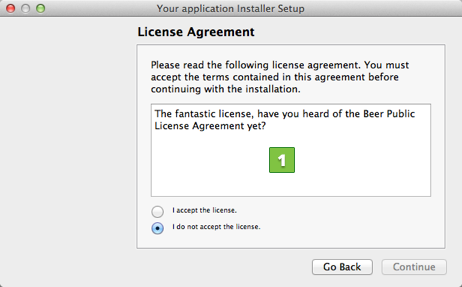
<License>指定包含许可协议 (1) 文本的文件名称,该文本显示在许可检查页面上:
选择默认内容
<Default>指定默认的组件是否被选中。 true将组件设置为选中的组件。 在本例中,我们使用script值表示在运行时解析值。 JavaScript脚本文件的名称,installscript.qs,是在<Script>中指定的。
创建安装程序内容
要安装的内容存储在组件的data目录中。 由于只有一个组件,因此将数据放在packages/com.vendor.product/data目录中。 该示例已经包含一个用于测试目的的文件,但您基本上可以在该目录中放置任何文件。
有关打包规则和选项的更多信息,请参见Data Directory一节。
创建二进制安装程序
现在,您可以创建第一个安装程序了。 在命令行中切换到examples\tutorial。 要创建一个名为yourInstaller的安装程序。包含由com.vendor.product标识的包。 输入以下命令:
�在Windows下:
..\..\bin\binarycreator.exe -c config\config.xml -p packages YourInstaller.exe
在Linux或OS X下:
../../bin/binarycreator -c config/config.xml -p packages YourInstaller
安装程序是在当前目录中创建的,您可以将它交付给最终用户。
有关使用binarycreator工具的更多信息,请参见binarycreator。
注意:如果在运行教程安装程序时显示错误消息,请检查您使用的是静态构建的Qt来创建安装程序。要了解更多信息请参见 Configuring Qt一节。
创建安装程序
创建离线安装程序
离线安装程序在安装过程中根本不会尝试连接到在线存储库。 但是,元数据配置 (config.xml) 使用户能够在线添加和更新组件。
在公司防火墙不允许最终用户连接到 Web 服务器的情况下,离线安装程序特别有用。 网络管理员可以在局域网内设置本地更新服务。
要创建离线安装程序,请使用 binarycreator 工具的 --offline-only 选项。
要在 Windows 中创建离线安装程序,请输入以下命令:
<location-of-ifw>\binarycreator.exe --offline-only -t <location-of-ifw>\installerbase.exe -p <package_directory> -c <config_directory>\<config_file> <installer_name>
某些选项具有默认值,因此您可以省略它们。 例如,输入以下命令以创建名为 SDKInstaller.exe 的安装程序二进制文件,其中包含 org.qt-project.sdk 标识的包及其依赖项:
binarycreator.exe --offline-only -c installer-config -p installer-packes SDKInstaller.exe
创建在线安装程序
除了存储在二进制文件中的描述之外,在线安装程序还获取存储库描述 (Updates.xml)。 创建存储库并将其上传到 Web 服务器。 然后在用于创建安装程序的 config.xml 文件中指定存储库的位置。
创建存储库
使用repogen工具创建一个包目录下所有包的在线存储库:
repogen.exe -p <package_directory> <repository_directory>
例如,要创建仅包含 org.qt-project.sdk.qt 和 org.qt-project.sdk.qtcreator 的存储库,请输入以下命令:
repogen.exe -p packages -i org.qt-project.sdk.qt,org.qt-project.sdk.qtcreator repository
创建存储库后,将其上传到 Web 服务器。 您必须在安装程序配置文件中指定存储库的位置。
配置存储库
安装程序配置文件 (config.xml) 中的 <RemoteRepositories> 元素可以包含多个存储库的列表。 它们中的每一个都可以具有以下设置:
<Url>:指向可用组件的列表。<Enabled>:值为0则禁用此存储库。<Username>:用作受保护存储库上的用户。<Password>,设置在受保护存储库上使用的密码。<DisplayName>:它可以选择设置要显示的字符串而不是 URL。
URL 需要指向列出可用组件的Updates.xml文件。 例如:
<RemoteRepositories>
     <Repository>
             <Url>http://www.example.com/packages</Url>
             <Enabled>1</Enabled>
             <Username>user</Username>
             <Password>password</Password>
             <DisplayName>Example repository</DisplayName>
     </Repository>
</RemoteRepositories>
安装程序只有在它可以访问存储库时才能工作。 如果安装后访问存储库,维护工具将拒绝安装。 但是,仍然可以卸载。 默认情况下可以启用或禁用存储库。 对于需要身份验证的存储库,也可以在此处设置详细信息,但通常不建议在此处输入密码,因为它以纯文本格式保存。 此处未设置的身份验证详细信息将在运行时使用对话框获取。 用户可以在运行时解决这些设置。
配置存储库目录
安装程序配置文件 (config.xml) 中的<RepositoryCategory>元素可以包含多个<RemoteRepositories>元素的列表。<RepositoryCageory>元素中的每个<RemoteRepositories> 元素都被视为一个类别。 每个类别可以有一个 <DisplayName>、一个 <Tooltip>、一个 <Preselected> 元素和几个 <Repository> 元素。 存储库目录显示在组件选择页面中,在组件选择widget的左侧:
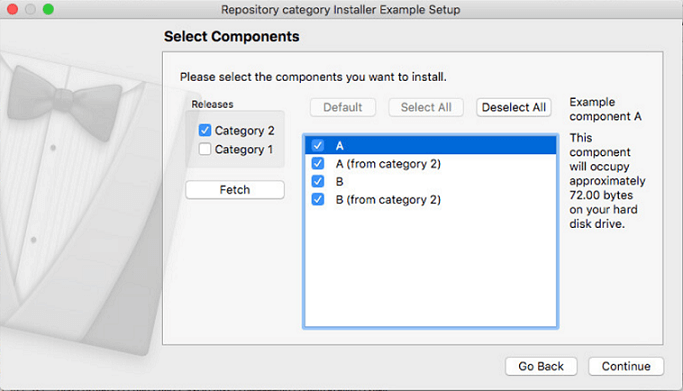
默认情况下,组件选择widget中仅显示没有类别的存储库。 检查一个或多个存储库并按 Fetch 将更新widget以显示来自所选分类存储库的内容。 存储库类别中的组件被标记为不稳定意味着您可以安装其他组件,尽管某些组件缺少依赖项、脚本错误等。 有关不稳定组件的更多信息,请参阅配置文件元素摘要。
创建存储库类别的示例:
<RepositoryCategories>
    <RemoteRepositories>
         <Displayname>Category 1</Displayname>
         <Preselected>true</Preselected>
         <Tooltip>Tooltip for category 1</Tooltip>
         <Repository>
                 <Url>http://www.example.com/packages</Url>
                 <Enabled>1</Enabled>
                 <Username>user</Username>
                 <Password>password</Password>
                 <DisplayName>Example repository</DisplayName>
         </Repository>
    </RemoteRepositories>
</RepositoryCategories>
创建安装程序二进制文件
要使用 binarycreator 工具创建在线安装程序,请输入以下命令:
<location-of-ifw>\binarycreator.exe -t <location-of-ifw>\installerbase.exe -p <package_directory> -c <config_directory>\<config_file> -e <packages> <installer_name>
例如,输入以下命令以创建名为 SDKInstaller.exe 的安装程序二进制文件,该二进制文件将不包含 org.qt-project.sdk.qt 和 org.qt-project.qtcreator 的数据,因为这些包是从远程存储库下载的:
binarycreator.exe -p installer-packages -c installer-config\config.xml -e org.qt-project.sdk.qt,org.qt-project.qtcreator SDKInstaller.exe
减小安装程序文件体积
即使组件是从 Web 服务器获取的,默认情况下 binarycreator 也会将它们添加到安装程序二进制文件中。 但是,当安装程序检查 Web 服务器是否有更新时,如果新版本不可用,最终用户无需下载。
或者,您可以创建不包含任何数据并从 Web 服务器获取所有数据的在线安装程序。 使用 binarycreator 工具的 -n 参数,只将根组件添加到安装程序中。 通常根组件是空的,因此只添加根的 XML 描述。
有关您拥有的选项的更多信息,请参阅 binarycreator 参数摘要。
推送更新
创建在线安装程序,以便能够向安装您的产品的最终用户推送更新。
需要以下步骤来推送更新:
- 将更新的内容复制到包目录。
- 增加
package.xml文件中更新组件的<Version>元素的值。 - 使用repogen 工具使用更新后的内容重新创建在线存储库,并在存储库的根目录中生成Updates.xml 文件。
- 将存储库上传到 Web 服务器。
- 使用 binarycreator 工具创建安装程序。
配置需要更新的内容
安装程序在启动时下载 Updates.xml 文件,并将安装的版本与文件中的版本进行比较。 如果文件中的在线版本号大于本地版本号,安装程序会将其显示在可用更新列表中。
增加package.xml 文件中组件的 <Version> 元素的值。
重写生成存储库
提供更新的最简单方法是重新创建存储库并将其上传到 Web 服务器。 有关更多信息,请参阅创建存储库。
部分更新存储库
在以下情况下,整个存储库的完整更新可能不是最佳选择:
- 存储库非常大,因为上传需要很长时间。
- 您只想交付更改的组件。
注意:repogen 每次被调用时都会重新创建 7zip 档案。由于 7zip 存储包含文件的时间戳(在此过程中移动或复制),因此每个存档的 SHA 总和会发生变化。 SHA 总和用于验证存档的下载,因此 SHA 需要匹配 7zip。由于 SHA 存储在 Updates.xml 文件中��,因此您将被迫上传完整的存储库。这可以通过使用 repogen 的 --update 选项来规避。
创建部分更新
重新创建在线存储库时,请使用--update 参数。它将现有存储库作为输入,并且仅更改指定为附加参数的组件。全局配置中也仅更改了那些 SHA 总和。
上传部分更新
将以下项目上传到 Web 服务器:
- 组件目录(通常类似于
com.vendor.product.updatedpart)。 - 全局Updates.xml 存储在在线存储库的根目录中。
注意:上传项目的顺序非常重要。如果您在实时服务器上更新存储库,请先更新组件,然后更新 Updates.xml。包名称包括版本号,因此,最终用户会收到旧包,直到新包完全上传。
更改存储库
要将当前更新存储库指向其他存储库,请编辑当前存储库中的 Updates.xml 文件。您可以添加、替换或删除存储库。
<RepositoryUpdate>
  <Repository action="..." OPTIONS />
  <Repository action="..." OPTIONS />
</RepositoryUpdate>
添加存储库
要更新存储库,请使用以下选项将<Repository> 子元素添加到 <RepositoryUpdate> 元素:
<Repository action="add" url="http://www.example.com/repository" name="user" password="password"
             displayname="Example Repository" />
url 将用作解析 Updates.xml 文件的基本 URL。 如果 url 本身是相对的,它将根据当前文档的基本 URL 进行解析。
displayname 指定应如何在维护工具的“设置”页面中命名存储库。
name 和 password 可以选择指定受保护存储库的凭据。
删除存储库
要删除存储库,请使用以下选项将 <Repository> 子元素添加到<RepositoryUpdate>元素:
<Repository action="remove" url="http://www.example.com/repository" />
url 必须与要删除的 URL 完全匹配。
替换存储库
要将一个存储库替换为另一个存储库,请使用以下选项将 <Repository> 子元素添加到 <RepositoryUpdate> 元素:
<Repository action="replace" oldUrl="http://www.example.com/repository"
            newUrl="http://www.example.com/newrepository" name="user" password="password"
            displayname="New Example Repository" />
oldUrl 必须与要替换的 URL 完全匹配。
newUrl 必须与其替换的 URL 完全匹配。
可重定位存储库
一些项目包含多个存储库。 要创建一组可重定位的存储库,您应该使用相对路径。
因此,如果位于 http://www.example.com/repositories/generic 和 Updates.xml 的通用存储库包含具有以下选项的 <Repository> 元素:
<Repository action="add" url="../module" name="user" password="password"
             displayname="Module Repository" />
那么添加的存储库的解析地址将是http://www.example.com/repositories/module,这样存储库不包含有关其绝对位置的信息。
如果要更改地址,只需按原样复制一组存储库即可。 建议将旧的通用存储库维护一段时间并如上所述替换地址。 您还可以为更新的安装程序提供新的通用地址。
您可以对 <Repository> 元素中的参数 url、oldUrl 和 newUrl 使用相对路径。
自定义安装程序
Qt IFW安装配置
Qt Installer Framework 简称 Qt IFW,是由 Qt 官方提供的安装程序制作框架。
使用 Qt IFW 生成的安装程序包含了一组页面,可在安装、更新或卸载过程中指导用户。我们要做的就是:提供可安装的内容并指定相关信息,如产品和安装包的名称、以及许可协议对应的文本。
如果要自定义安装程序,�可以向预定义页面添加部件(或者添加整个页面),来向用户提供附加选项。此外,还可以创建脚本,以向安装程序添加操作。
下载安装
进入 Qt IFW 下载页(参考:http://download.qt.io/official_releases/qt-installer-framework/),里面包含了所有的发行版。另外在在线更新的MaintenanceTool.exe下选择Qt Installer Framework组件安装也是可行的。
安装完成后,可在D:\Qt\Tools\QtInstallerFramework\3.1找到安装目录。为了便于后期使用,对各目录进行一些简单的说明:
- bin:提供了一些基本的工具,比如打包要用的 binarycreator。
- doc:包含了相应的帮助文档,有助于更好的掌握 Qt IFW。
- examples:有各种各样的示例,方便我们学习研究。
- Licenses:许可协议。
基本配置
使用示例
Qt IFW 上手比较容易,因为它不但提供了详细的帮助文档,还包含了大量的示例,这些示例的源码位于 examples 目录下。
用 Qt Creator 打开 examples/examples.pro,然后进行编译,随后会生成相应的安装程序,如果有兴趣,不妨分别安装一下,看看每个安装程序的效果。
Qt IFW 创建安装程序
在准备好程序的目录结构之后,接下来的任务就是要创建安装程序,这通常有很多好处:
- 压缩软件的大小;
- 简化软件的安装过程;
- 提供亲切、友好的操作界面;
- 保护软件的完整性,避免被盗版、破解或植入病毒。
那么,如何通过 Qt IFW 创建安装程序呢?一起来看看吧!
创建包目录
打包的第一步,先要创建一个类似于下面这样的包目录(必须包含 config 和 packages 子目录),以反映安装程序的设计并允许将来扩展:
Deploy
  ├ config
  └ packages
   	 └ com.kylin.ifw
   	 	├ data
   	 	└ meta
如果不想手动创建,有一个简单的办法:从 Qt IFW 安装目录下的 examples 里复制一份,然后在该基础上进行修改。
创建配置文件
为了自定义安装程序的 UI 和行为,我们需要创建一个配置文件,该文件通常被命名为 config.xml,位于 config 目录中。
配置文件由根元素 <Installer> 组成,并且必须包含子元素 <Name> 和 <Version> 。但是其他子元素是可选的,而且可以以任意顺序出现。
来看一个典型的配置文件:
<?xml version="1.0" encoding="UTF-8"?>
<Installer>
    <Name>MyApp</Name>
    <Version>1.0.0</Version>
    <Title>MyApp Installer</Title>
    <Publisher>Kylin</Publisher>
    <StartMenuDir>IFW Examples</StartMenuDir>
    <TargetDir>@ApplicationsDir@/MyApp</TargetDir>
</Installer>
其中,各个元素的含义如下所示:
| 元素 | 描述 |
|---|---|
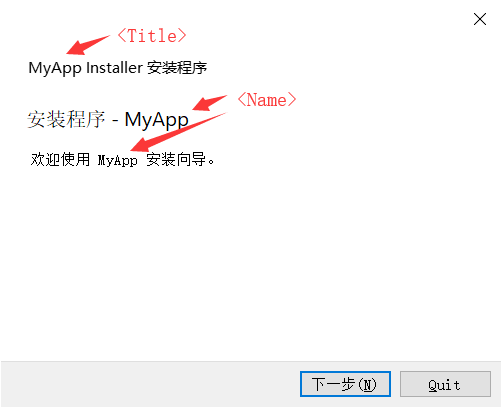
<Title> | 标题栏上的安装程序名称 |
<Name> | 被添加到页面名称和简介文本中的应用程序名称 |
<Version> | 程序的版本号 |
<Publisher> | 软件的发布者(如 Windows 控制面板中所示) |
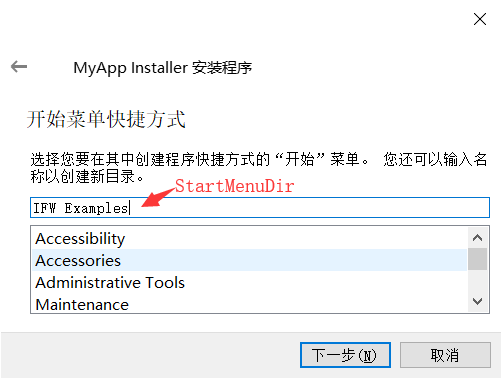
<StartMenuDir> | Windows 开始菜单中产品的默认程序组名称 |
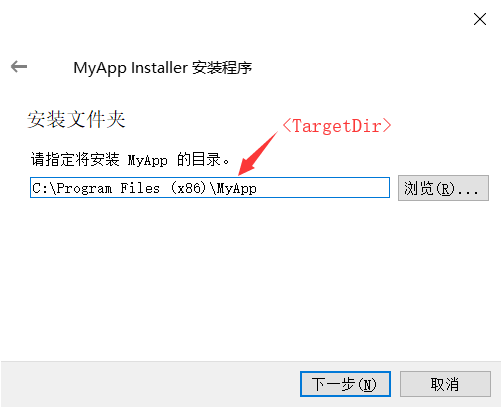
<TargetDir> | 程序安装的目标路径 |
最终,这些信息将被显示在介绍页面上:
有关配置文件的格式和可用元素的更多信息,请参见 Configuration File(https://doc.qt.io/qtinstallerframework/ifw-globalconfig.html)。
创建包信息文件
对于我们来说,安装程序只处理一个组件 - com.waleon.ifw。要向安装程序提供有关组件的信息,需要创建一个名为 package.xml 的文件,并将其放在 meta 目录中。
以下是我们为组件提供的一些信息:
<?xml version="1.0" encoding="UTF-8"?>
<Package>
    <DisplayName>MyApp</DisplayName>
    <Description>The first ifw installer.</Description>
    <Version>1.0.0-1</Version>
    <ReleaseDate>2019-11-18</ReleaseDate>
    <Default>true</Default>
    <Script>installscript.qs</Script>
</Package>
其中,各个元素的含义如下所示:
| 元素 | 描述 |
|---|---|
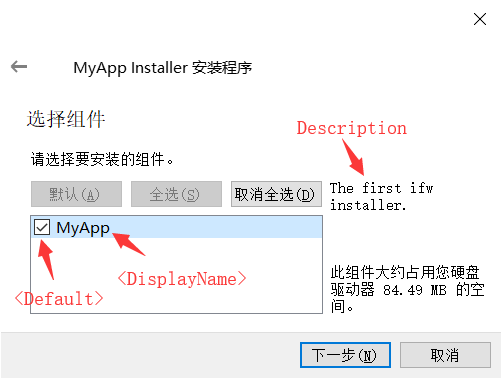
<DisplayName> | 组件的名称 |
<Description> | 组件的描述信息 |
<Version> | 组件的版本号(当有可用的版本时,用于推广更新) |
<ReleaseDate> | 组件的发布日期 |
<Default> | 如果在安装程序中预先选择了组件,则为 true。 |
<Script> | JavaScript 文件名,用于在加载时执行一些安装操作。 |
最终,这些信息将被显示在组件页面上:
有关包信息文件的更多信息,请参见 Package Information File Syntax(https://doc.qt.io/qtinstallerframework/ifw-component-description.html#package-information-file-syntax)。
添加到开始菜单
如果要添加开始菜单快捷方式,则需要用到(由上述 <Script> 元素指定的)脚本文件 - installscript.qs:
function Component()
{
    // 默认构造
}

Component.prototype.createOperations = function() {
    // 调用默认实现
    component.createOperations();

    // 添加开始菜单
    if (systemInfo.productType === "windows") {
        component.addOperation("CreateShortcut","@TargetDir@/bin/MyApp.exe","@StartMenuDir@/MyApp.lnk","workingDirectory=@TargetDir@");
    }
}
当程序安装完成之后,就能在开始菜单中找到了。
准备打包文件
data 目录用于存放最终要打包的文件(.exe、.dll 等)。Qt IFW 在制作安装程序时,会用自带的 archivegen 工具将这些文件压缩成 7zip 格式;然后在安装时,再从压缩包中将它们提取出来。
这是最简单,也是最关键的一环。只需要将所有程序文件拷贝到 data 目录下即可:
当一切准备就绪,就可以创建第一个安装程序了。
生成安装程序
要生成安装程序,需要借助 Qt IFW 提供的 binarycreator 工具(参考:https://doc.qt.io/qtinstallerframework/ifw-tools.html#binarycreator)。这个工具十分强大,除了创建离线/在线安装程序之外,还支持像 -v 这样的选项,以便于调试输出。
打开 CMD(或者 PowerShell),并进入包目录 Deploy,然后输入 binarycreator -c config\config.xml -p packages MyInstaller.exe -v 命令。
PS F:\Deploy> binarycreator -c config\config.xml -p packages MyInstaller.exe -v                                         [0] Parsed arguments, ok.
[4]
Collecting information about available packages...
[6] Found subdirectory "com.kylin.ifw"
[8] - it provides the package "com.kylin.ifw"  -  "1.0.0-1"
[11] Copying component data for "com.kylin.ifw"
[14] Compressing data directory "audio"

[426] Compressing data directory "platforms"
......
[2496] Compressing data directory "translations"
[3131] Compressing data directory "virtualkeyboard"
[3587] Compressing files found in data directory: ("F:/Deploy/packages/com.kylin.ifw/data/Calculator.exe", "F:/Deploy/packages/com.kylin.ifw/data/D3Dcompiler_47.dll", "F:/Deploy/packages/com.kylin.ifw/data/libEGL.dll", "F:/Deploy/packages/com.kylin.ifw/data/libgcc_s_seh-1.dll", "F:/Deploy/packages/com.kylin.ifw/data/libGLESV2.dll", "F:/Deploy/packages/com.kylin.ifw/data/libstdc++-6.dll", "F:/Deploy/packages/com.kylin.ifw/data/libwinpthread-1.dll", "F:/Deploy/packages/com.kylin.ifw/data/opengl32sw.dll", "F:/Deploy/packages/com.kylin.ifw/data/Qt5Core.dll", "F:/Deploy/packages/com.kylin.ifw/data/Qt5Gui.dll", "F:/Deploy/packages/com.kylin.ifw/data/Qt5Multimedia.dll", "F:/Deploy/packages/com.kylin.ifw/data/Qt5MultimediaQuick.dll", "F:/Deploy/packages/com.kylin.ifw/data/Qt5Network.dll", "F:/Deploy/packages/com.kylin.ifw/data/Qt5Qml.dll", "F:/Deploy/packages/com.kylin.ifw/data/Qt5Quick.dll", "F:/Deploy/packages/com.kylin.ifw/data/Qt5QuickControls2.dll", "F:/Deploy/packages/com.kylin.ifw/data/Qt5QuickTemplates2.dll", "F:/Deploy/packages/com.kylin.ifw/data/Qt5QuickTest.dll", "F:/Deploy/packages/com.kylin.ifw/data/Qt5Svg.dll", "F:/Deploy/packages/com.kylin.ifw/data/Qt5Test.dll", "F:/Deploy/packages/com.kylin.ifw/data/Qt5Widgets.dll", "F:/Deploy/packages/com.kylin.ifw/data/Qt5WinExtras.dll")
[16152] Hash is stored in "C:/Users/LuoCai/AppData/Local/Temp/binarycreator-l9Mfi9/com.kylin.ifw/1.0.0-1audio.7z.sha1"
[16158] Creating hash of archive "C:/Users/LuoCai/AppData/Local/Temp/binarycreator-l9Mfi9/com.kylin.ifw/1.0.0-1audio.7z"
[16164] Generated sha1 hash: "c8e4c1a94a474dd9735b0873a95c4cc8cd31f2fe"
[16181] Hash is stored in "C:/Users/LuoCai/AppData/Local/Temp/binarycreator-"packages/com.kylin.ifw/meta/installscript.qs"
[16867] done.

[16874] Begin to copy configuration file and data.
[16879] Copying associated "configuration" file "F:/Deploy/config/config.xml"
[16885] done.

[16887] Read dom element: <Name>MyApp</Name>.
[16889] Read dom element: <Version>1.0.0</Version>.
[16893] Read dom element: <Title>MyApp Installer</Title>.
[16904] Read dom element: <Publisher>Kylin</Publisher>.
[16907] Read dom element: <StartMenuDir>IFW Examples</StartMenuDir>.
[16912] Read dom element: <TargetDir>@ApplicationsDir@/MyApp</TargetDir>.
[16919] done.

[16966] Creating the binary
[17116] Creating resource archive for "com.kylin.ifw"
......
[17156] Appending "C:/Users/LuoCai/AppData/Local/Temp/binarycreator-l9Mfi9/com.kylin.ifw/1.0.0-1iconengines.7z" ("18.63 KB")
reator-l9Mfi9/com.kylin.ifw/1.0.0-1imageformats.7z" ("490.31 KB")
......
[17799] Cleaning up...
PS F:\Deploy>
待执行成功之后,会生成一个名为 MyInstaller.exe 的安装程序:
不要忘了测试一下,看最终的安装效果是否如预期一样?程序的各项功能是否正常?假如没有任何问题,便可以将其交付给最终用户了。
Qt IFW 覆盖安装
在默认情况下,Qt IFW 不支持离线升级。如果将一个程序的新版本安装到其旧版本所在目录,会提示错误:您选择的目录已存在且包含安装程序,选择其它目标进行安装。
这样一来,要升级程序就只能先手动卸载旧版本,然后才能安装新版本。显然这是一件很麻烦的事情,为了简化这个过程,可以使用覆盖安装。
自动卸载
覆盖安装实现起来并不困难,它只不过是将上述操作“自动化”了而已。即在安装新版本之前,先利用脚本对旧版本进行卸载,而这一步无需用户干预。
至于真正的卸载,我们可以使用 maintenancetool,它是 Qt 中的维护工具,用于添加/更新/删除组件。有关该工具支持的选项,可以通过 -h 来查看:
PS D:\Qt> .\MaintenanceTool.exe -h
PS D:\Qt> Usage: D:\Qt\MaintenanceTool.exe [options] Key=Value
PS D:\Qt>
Options:
  -?, -h, --help                           Displays this help.
  --version                                Displays version information.
  --framework-version                      Displays the version of the Qt
                                           Installer Framework.
  -v, --verbose                            Verbose mode. Prints out more
                                           information.
  --proxy                                  Use system proxy on Windows and
                                           Linux. This option has no effect on
                                           OS X.
  --no-proxy                               Do not use system proxy.
  --script <file>                          Execute the script given as
                                           argument.
  --checkupdates                           Check for updates and return an XML
                                           description.
  --updater                                Start application in updater mode.
  --manage-packages                        Start application in package manager
                                           mode.
  --no-force-installations                 Allow deselecting components that
                                           are marked as forced.
  --show-virtual-components                Show virtual components in installer
                                           and package manager.
  --logging-rules <rules>                  Enables logging according to passed
                                           rules. Comma separated logging rules
                                           have the following syntax:
                                           loggingCategory=true/false. Passing
                                           empty logging rules enables all
                                           logging categories. The following
                                           rules enable a single category:
                                           ifw.*=false,ifw.category=true The
                                           following logging categories are
                                           available:
                                           ifw.componentChecker
                                           ifw.resources
                                           ifw.translations
                                           ifw.network
  --create-local-repository                Create a local repository inside the
                                           installation directory. This option
                                           has no effect on online installers.
  --addRepository <URI,...>                Add a local or remote repository to
                                           the list of user defined
                                           repositories.
  --addTempRepository <URI,...>            Add a local or remote repository to
                                           the list of temporary available
                                           repositories.
  --setTempRepository <URI,...>            Set a local or remote repository as
                                           temporary repository, it is the only
                                           one used during fetch.
                                           Note: URI must be prefixed with the
                                           protocol, i.e. file:///, https://,
                                           http:// or ftp://.
  --startserver <mode,socketname,key>      Starts the application as headless
                                           process waiting for commands to
                                           execute. Mode can be DEBUG or
                                           PRODUCTION. In DEBUG mode, the option
                                           values can be omitted.Note: The
                                           server will not shutdown on his own,
                                           you need to quit the process by hand.
  --startclient <socketname,key>           Starts the application to debug the
                                           client-server communication. If a
                                           value is omitted, the client will use
                                           a default instead. Note: The server
                                           process is not started by the client
                                           application in that case, you need to
                                           start it on your own.
  --installCompressedRepository <URI,...>  Installs QBSP or 7z file. The QBSP
                                           (Board Support Package) file must be
                                           a .7z file which contains a valid
                                           repository.
  --silentUpdate                           Updates all packages silently.
  --platform <plugin>                      Use the specified platform plugin.
  --squish-port <port number>              Give a port where Squish can connect
                                           to. If no port is given, default port
                                           11233 is used. Note: To enable Squish
                                           support you first need to build IFW
                                           with SQUISH_PATH parameter where
                                           SQUISH_PATH is pointing to your
                                           Squish installation folder:
                                           <path_to_qt>/bin/qmake -r
                                           SQUISH_PATH=<pat_to_squish>

Arguments:
  Key=Value                                Key Value pair to be set.
对于我们来说,比较有用的是 --script 选项,可以利用它来控制指定的脚本(例如:uninstallscript.qs)以完成卸载。
关于卸载脚本的编写,相对而言也比较容易(参考:https://doc.qt.io/qtinstallerframework/noninteractive.html),我们可以通过模拟用户单击与 UI 交互,来实现最终的卸载功能:
// 卸载脚本:如果程序已安装,则会调用 maintenance 工具,自动进行卸载。

function Controller()
{
    gui.clickButton(buttons.NextButton);
    gui.clickButton(buttons.NextButton);

    // 连接信号槽
    installer.uninstallationFinished.connect(this, this.uninstallationFinished);
}

// 当卸载完成时,触发
Controller.prototype.uninstallationFinished = function()
{
    gui.clickButton(buttons.NextButton);
}

// 与完成页面上的部件交互
Controller.prototype.FinishedPageCallback = function()
{
    gui.clickButton(buttons.FinishButton);
}
现在,用之前的安装程序测试一下,执行 maintenancetool.exe --script=uninstallscript.qs 命令。则会成功卸载。
有了这些基本知识,现在对上一节《Qt IFW 创建安装程序》中的内容进行完善,加上覆盖安装功能,即可实现覆盖安装。
自定义UI
既然是覆盖安装,必然少不了对安装位置的检测,一旦发现程序已安装,往往需要加一些友好性的提示信息(例如:上图中显示的“检测到程序已安装,继续将会被覆盖。”)。
要完成这一步,则需要为安装程序添加自定义 UI。首先,要在 meta 目录下添加一个 targetwidget.ui 界面文件:
<?xml version="1.0" encoding="UTF-8"?>
<ui version="4.0">
 <class>TargetWidget</class>
 <widget class="QWidget" name="TargetWidget">
  <property name="geometry">
   <rect>
    <x>0</x>
    <y>0</y>
    <width>491</width>
    <height>190</height>
   </rect>
  </property>
  <property name="sizePolicy">
   <sizepolicy hsizetype="Preferred" vsizetype="Preferred">
    <horstretch>0</horstretch>
    <verstretch>0</verstretch>
   </sizepolicy>
  </property>
  <property name="minimumSize">
   <size>
    <width>491</width>
    <height>190</height>
   </size>
  </property>
  <property name="windowTitle">
   <string>Form</string>
  </property>
  <layout class="QVBoxLayout" name="verticalLayout">
   <item>
    <widget class="QLabel" name="description">
     <property name="text">
      <string>description</string>
     </property>
    </widget>
   </item>
   <item>
    <layout class="QHBoxLayout" name="horizontalLayout">
     <property name="spacing">
      <number>6</number>
     </property>
     <item>
      <widget class="QLineEdit" name="targetDirectory">
       <property name="readOnly">
        <bool>true</bool>
       </property>
      </widget>
     </item>
     <item>
      <widget class="QPushButton" name="targetChooser">
       <property name="text">
        <string>...</string>
       </property>
      </widget>
     </item>
    </layout>
   </item>
   <item>
    <widget class="QLabel" name="warning">
     <property name="enabled">
      <bool>true</bool>
     </property>
     <property name="text">
      <string>warning</string>
     </property>
    </widget>
   </item>
   <item>
    <spacer name="verticalSpacer">
     <property name="orientation">
      <enum>Qt::Vertical</enum>
     </property>
     <property name="sizeHint" stdset="0">
      <size>
       <width>20</width>
       <height>122</height>
      </size>
     </property>
    </spacer>
   </item>
  </layout>
 </widget>
 <resources/>
 <connections/>
</ui>
然后,还需要在 package.xml 文件中用 <UserInterfaces> 元素标记它:
<?xml version="1.0" encoding="UTF-8"?>
<Package>
    <DisplayName>MyApp</DisplayName>
    <Description>The first ifw installer.</Description>
    <Version>1.0.0-1</Version>
    <ReleaseDate>2019-10-12</ReleaseDate>
    <Default>true</Default>
    <Script>installscript.qs</Script>
    <UserInterfaces>
        <UserInterface>targetwidget.ui</UserInterface>
    </UserInterfaces>
</Package>
指定卸载脚本
上面已经介绍了卸载脚本 uninstallscript.qs 的编写,现在需要做的是将该脚本放入 data 目录中(例如:data/script/uninstallscript.qs),最终由 Qt IFW 打包进安装程序。
这样的话,卸载脚本就会被安装至最终目录。当需要进行覆盖安装时,maintenancetool 工具就可以很容易的找到它了。
修改安装脚本
经过上面几步,我们已经添加了自定义 UI 以及卸载要用到的脚本,现在是时候将交互部分添加到安装脚本 installscript.qs 中了:
var targetDirectoryPage = null;

// 构造函数
function Component()
{
    installer.gainAdminRights();
    component.loaded.connect(this, this.installerLoaded);
}

// 实用函数,类似于 QString QDir::toNativeSeparators()
var Dir = new function () {
    this.toNativeSparator = function (path) {
        if (installer.value("os") == "win")
            return path.replace(/\//g, '\\');
        return path;
    }
};

// 添加桌面和开始菜单快捷方式
Component.prototype.createOperations = function()
{
    component.createOperations();
    component.addOperation("CreateShortcut",
                           "@TargetDir@/bin/MyApp.exe",
                           "@DesktopDir@/MyApp.lnk",
                           "workingDirectory=@TargetDir@");

    component.addOperation("CreateShortcut",
                           "@TargetDir@/bin/MyApp.exe",
                           "@StartMenuDir@/MyApp.lnk",
                           "workingDirectory=@TargetDir@");
}

// 加载组件后立即调用
Component.prototype.installerLoaded = function()
{
    installer.setDefaultPageVisible(QInstaller.TargetDirectory, false);
    installer.addWizardPage(component, "TargetWidget", QInstaller.TargetDirectory);

    targetDirectoryPage = gui.pageWidgetByObjectName("DynamicTargetWidget");
    targetDirectoryPage.windowTitle = "选择安装目录";
    targetDirectoryPage.description.setText("请选择程序的安装位置:");
    targetDirectoryPage.targetDirectory.textChanged.connect(this, this.targetDirectoryChanged);
    targetDirectoryPage.targetDirectory.setText(Dir.toNativeSparator(installer.value("TargetDir")));
    targetDirectoryPage.targetChooser.released.connect(this, this.targetChooserClicked);

    gui.pageById(QInstaller.ComponentSelection).entered.connect(this, this.componentSelectionPageEntered);
}

// 当点击选择安装位置按钮时调用
Component.prototype.targetChooserClicked = function()
{
    var dir = QFileDialog.getExistingDirectory("", targetDirectoryPage.targetDirectory.text);
    if (dir != "") {
        targetDirectoryPage.targetDirectory.setText(Dir.toNativeSparator(dir));
    }
}

// 当安装位置发生改变时调用
Component.prototype.targetDirectoryChanged = function()
{
    var dir = targetDirectoryPage.targetDirectory.text;
    if (installer.fileExists(dir) && installer.fileExists(dir + "/bin/MyApp.exe")) {
        targetDirectoryPage.warning.setText("<p style=\"color: red\">检测到程序已安装,继续将会被覆盖。</p>");
    } else {
        targetDirectoryPage.warning.setText("");
    }
    installer.setValue("TargetDir", dir);
}

// 当进入【选择组件】页面时调用
Component.prototype.componentSelectionPageEntered = function()
{
    var dir = installer.value("TargetDir");
    if (installer.fileExists(dir) && installer.fileExists(dir + "/maintenancetool.exe")) {
        installer.execute(dir + "/maintenancetool.exe", "--script=" + dir + "/script/uninstallscript.qs");
    }
}
基本的思路就是这样,如果有什么细节需要修改,直接完善以上脚本即可。
Qt IFW 创建在线安装程序
与其他打包工具相比,Qt IFW 有很多优点:简单、易上手、跨平台...此外,它既能创建离线安装程序,又能创建在线安装程序。
如果看过之前的 Qt IFW 相关教程,你会发现创建在线安装程序并不困难,它只不过是多了一些存储库的创建、以及配置过程而已。
配置存储库
为了能够检测更新,需要在 config.xml 文件中配置存储库的信息。这些信息由 <RemoteRepositories> 元素指定,它可以包含若干个 <Repository> 子元素,每一个都包含以下信息:
| 元素 | 描述 |
|---|---|
<Url> | 存储库的地址,指向列出可用组件列表的 Updates.xml 文件。 |
<Enabled> | 若为 0,则禁用存储库。 |
<Username> | 对于需要身份验证的存储库,用来表示用户名。 |
<Password> | 对于需要身份验证的存储库,用来表示密码。 |
<DisplayName> | 设置要显示的字符串,而非 Url。 |
例如,我使用的是自己 Github 上的存储库:
<?xml version="1.0" encoding="UTF-8"?>
<Installer>
    <Name>MyApp</Name>
    <Version>1.0.0</Version>
    <Title>MyApp Installer</Title>
    <Publisher>Waleon</Publisher>
    <StartMenuDir>IFW Examples</StartMenuDir>
    <TargetDir>@ApplicationsDir@/MyApp</TargetDir>
    <RemoteRepositories>
        <Repository>
            <Url>https://raw.githubusercontent.com/kylin/QtIFW/master/OnlineUpdate/repository</Url>
            <Enabled>1</Enabled>
            <Username>user</Username>
            <Password>password</Password>
            <DisplayName>Example repository</DisplayName>
        </Repository>
    </RemoteRepositories>
</Installer>
注意:密码是以纯文本形式保存的,因此不建议在这里输入。此处如果未设置身份认证信息,将会在运行时通过对话框获取,用户可以在运行时处理这些设置。
制作安装程序
当存储库配置完成之后,我们先来制作一个安装程序,还是使用之前介绍过的命令:
binarycreator -c config\config.xml -p packages MyInstaller.exe -v
完成之后进行安装,这相当于一个旧版本,稍后会用于测试更新。
创建在线存储库
打开 package.xml 文件,增加其中的版本号(要升级必须做增加,因为检测更新比对的正是版本号),比如从 1.0.0-1 增加到 2.0.0-1:
<?xml version="1.0" encoding="UTF-8"?>
<Package>
    <DisplayName>MyApp</DisplayName>
    <Description>The first ifw installer.</Description>
    <Version>2.0.0-1</Version>
    <ReleaseDate>2019-11-11</ReleaseDate>
    <Default>true</Default>
    <Script>installscript.qs</Script>
</Package>
然后利用 repogen 工具,将包转换为安装程序能在运行时获取的文件结构:
repogen -p packages repository
当执行完成之后,便会生成一个名为 repository 的存储库目录。该目录包含了包数据的完整副本,和一些额外生成的元数据(例如:SHA 校验码)。
为了让该目录可用,现在将其应用于 config.xml 文件中配置的 Url 上(即:上传至 Github,其中的 Url 可以点击 raw 来获取):
也有一种更简单的测试方法,就是将本地绝对路径当作存储库的 Url(例如:file:///E:/QtIFW/OnlineUpdate/repository)。
在线更新
进入之前的安装程序,运行 maintenancetool 程序,选择【Update components】以更新组件:
这时候,就能看到待更新的版本了(若当前程序已经是最新版本,将会提示“无可用更新”):
选择相应的组件,进行更新:
当更新完成之后,我们的程序就变成最新的版本了!
另外,存储库的信息可以在设置里面找到:
可以通过“添加”按钮来新增存储库,并利用“条件测试”来检测其是否可用。
Qt IFW 实现自动升级
对于桌面应用程序而言,自动升级功能往往是必不可少的。当每次启动程序(或者手动点击更新按��钮)时,应检测服务端是否有新版本出现。如果存在,则提示并更新;否则,提示当前已是最新版本。
在 Qt IFW 中,如果要实现这样的功能,可以利用 maintenancetool 维护工具及其两个重要选项:
- --checkupdates:检测更新,并返回一个 XML。
- --updater:以更新模式启动应用程序。
注意:要实现自动更新,必须要有一个在线存储库,这部分内容可参考《Qt IFW 创建在线安装程序》。
检测更新
为了获取更新相关的信息,我们新建一个 bat 脚本,并通过以下命令将输出重定向到 checkUpdate.txt 文件中:
@echo off
maintenancetool --checkupdates > checkUpdate.txt
当有可用的更新时,maintenancetool 会返回一个 XML,其中包含了新版本的名称、大小、以及版本号:
<updates>
    <update size="88595823" version="1.2.2-1" name="MyApp"/>
</updates>
倘若没有任何更新,将不会返回任何内容。
以更新模式启动 maintenancetool
一旦检测到有新版本存在,只需要以更新模式启动 maintenancetool 就行了:
maintenancetool --updater
这样以来,默认就会选择【Update components】选项,剩下的具体要更新哪些组件,就交由用户选择了。
具体实现
为了启动外部程序,先简单介绍下 QProcess 类,它有两种启动方式:
- 一体式:start(),外部程序启动后,将随主程序的退出而退出。
- 分离式:startDetached(),外部程序启动后,当主程序退出时并不退出,而是继续运行。
好了,正式开始吧!在使用 --checkupdates 检测更新时,并不会运行 GUI,而是仅输出更新信息:
QString program("D:/Program Files/MyApp/maintenancetool.exe");
QStringList checkArgs;
checkArgs << "--checkupdates";

// 检测更新
QProcess process;
process.start(program, checkArgs);

// 等待检测完成
if (!process.waitForFinished()) {
    qDebug() << "Error checking for updates.";
    return;
}

// 读取输出内容
QByteArray data = process.readAllStandardOutput();

// 没有输出意味着没有可用的更新
if (data.isEmpty()) {
    qDebug() << "No updates available.";
    return;
}
// 倘若需要特定的更新信息,应该解析输出的 XML。
当检测到有可用的更新之后,以更新模式启动 maintenancetool:
// 以分离式启动
QStringList updaterArgs;
updaterArgs << "--updater";
bool success = QProcess::startDetached(program, updaterArgs);
if (!success) {
    qDebug() << "Program startup failed.";
    return;
}
需要注意的是,这里需要以分离式启动,因为程序需要关闭以进行更新。
在启动成功之后,最后记得关闭程序:
// 关闭程序
qApp->closeAllWindows();
虽然这一段代码比较简短,但足以说明自动更新的流程。倘若要寻找更完善的功能,可参考 https://github.com/Skycoder42/QtAutoUpdater。